(this is a stream-of-conscious rambling of the making of a basic video game)
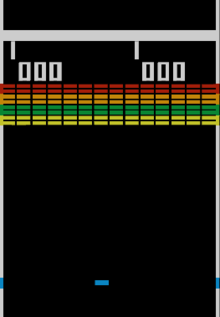
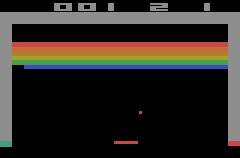
Breakout is one of the first video games. Sort of like a single-player version of Pong, where instead of trying to get a ball past your opponent, you are trying to get your ball to hit all the bricks until you clear a board.
To this day, Breakout style games are constantly popular in App Stores everywhere. They are a timeless waste of time.
Given the simplicity of the basic game (modern versions add all sorts of complications), it seems like a good way to get my feet wet in creating a video game.
I've been a professional programmer for going on 30 years now, and have never created a video game. It seems like a glaring omission on my part. As a self-taught programmer, the math aspect of video game creation always intimidated me (my college degree is in writing poetry, something that is also a timeless waste of time.)
My intent is to create multiple versions of a Breakout style game using different programming languages, different technologies and different techniques to try my hand at "video game creation."
For the first version I'm going to use the tools I'm most familiar with, and try to depend on as few external libraries as possible. For me, that means I'll write it in C# and use the most primitive and "low-tech" ways of drawing the game board.
The other thing I want to do with this first version is look up as little as possible on the Best Practices for video game creation. As much as possible, I want to figure this out on my own. I'm sure there are dozens of libraries out there which would let me slap together a game like this in a day or so, but that's not the point of this learning project for me.
I'm sure I'll have to look up the trigonometry pieces for actually calculating the ball movements, of course. It has been 30 years since my last math class.
Setting Up the Project
First step is opening Rider and creating a new desktop application. I haven't made a desktop application in years. Everything now-a-days seems to be web applications of some sort.
All I see in the options for desktop applications are Windows Forms applications and WPF Applications. I've made both in the past, but I'm pretty sure they are old technologies. I thought Maui was the new way to develop desktop applications these days. I'm surprised it isn't already installed.
I need to separately install Maui, apparently.
dotnet workload install maui
dotnet workload install wasm-tools
Wow, that's installing a lot.
While that is running, let's read about the...
History of the Game
The wikipedia page for Breakout is fascinating. Apparently it was originally written by Steve Wozniak! How cool! He wrote it in May of 1976, when I was only 3 months old. Apparently, later in life, when Wozniak was designing the Apple II, a lot of the features he chose to include in that computer was directly influenced by Breakout. Things like graphics commands in BASIC, paddle support, sound, and color graphics!
He is quoted in the Wikipedia article as saying:
Basically, all the game features were put in just so I could show off the game I was familiar with—Breakout—at the Homebrew Computer Club. It was the most satisfying day of my life [when] I demonstrated Breakout—totally written in BASIC. It seemed like a huge step to me. After designing hardware arcade games, I knew that being able to program them in BASIC was going to change the world.
Who knew Breakout was so important!
Ok, Maui is installed. Let's restart Rider and create a new Maui App.
Maui
So a new Maui app won't even build without an Android SDK installed? Ok, let's install Android Studio and get an SDK! Yay, more installing things! I'm fine with this, though, since I intend to eventually write my Breakout clone in native Android as well.
...
Now it is complaining that I don't have the proper Android SDK version, but the version it is looking for isn't even available to install. I've posted a question in the Maui discussion board about this. But, for now, I am going to punt on Maui, this is a distraction from actually building what I want to build. I'm not even trying to build a mobile version right now, just a desktop app.
I guess I was under the impression that Maui was the new windows desktop app technology that gave you the option to make mobile versions of your app, not FORCE you to make mobile versions of your apps.
I might come back to Maui when I get to the mobile versions of this project. But, honestly, probably not. I was planning to build that in Kotlin.
Let's leave aside the idea of HOW to display the game for now and let's instead...
Think About the Game
 (
(There's not a lot of elements to the most basic Breakout clone (which I will very uncreatively call Brick Out.) The elements I can think of immediately:
- Brick
- Ball
- Paddle
- GameBoard
As I've said already, and as I'll probably repeat hundreds of times in this series, I am not a game programmer. And, at least in this first version of the game, I am deliberately trying NOT to learn about game programming. I want this version to be as naive an implementation as possible.
So that said, from a code structure point of view, I am going to create types for each of the elements (a "model" as it were), and then a separate type to encapsulate the logic:
The model:
public class Brick {}
public class Ball { }
public class Paddle {}
public class GameBoard {}
The logic:
public class BrickOutGame {}
Laying Out the GameBoard: Grid vs Coordinates
If I think about the GameBoard, I can think that there might be a grid system that defines the game board (Rows and Columns), with Bricks and Paddles being able to span multiple columns.
Obviously that can't be right. If right from the very first definition I am already defining elements which "Break Out" from the grid (puns are fun!) then obviously a grid system isn't the right way to think about it.
I mean, it IS a grid, of course, but just not a "column layout" type of grid, and more as Cartesian coordinates.
Tracking state with a coordinate system instead of a grid system will mean tracking the pixel layout of each element. It is more flexible, but also harder to reason about than a grid. With pixels we are going to have to test if objects overlap, wheras with a grid, we would just have a multi-dimensional array that tracks the contents of each item.
I'm not sure which is best, so for now I am going to stay open to both possibilities.
Giving the Items Some Dimension
Let's define some sizes for items that interact with each other. I'll create a base interface called DisplayItem that will hold the shape of the item and its location:
public interface DisplayItem
{
    public Rectangle Shape { get; set; }
}
And make Bricks, Balls, and Paddles have some sizes (I'll come back to location in a bit):
public class Brick : DisplayItem
{
    public Rectangle Shape { get; set; } = new(0, 0, 20, 10);
}

public class Ball : DisplayItem
{
    public Rectangle Shape { get; set; } = new(0, 0, 5, 5);
}

public class Paddle : DisplayItem
{
    public Rectangle Shape { get; set; } = new(0, 0, 40, 5);
}
So a brick is 20 pixels wide by 10 pixels high. A ball is a 5 pixels by 5 pixels (that's not going to roll very well!) and the paddle is 40 pixels wide by 5 pixels high.
And then, for the GameBoard, let's start with hardcoding VGA-sized graphics, 640x480. And let's create some properties to store the other DisplayItems:
public class GameBoard
{
    public int Height { get; set; } = 640;
    public int Width { get; set; } = 480;

    public List<Brick> Bricks { get; set; } = new();
    public Ball Ball { get; set; } = new();
    public Paddle Paddle { get; set; } = new();
}
And finally, let's say our first game is going to have 6 rows (again, just hardcoding this for now), and if it is 480 pixels wide that means we can fit 24 20pixel bricks on a row (480 / 20 = 24). Let's go ahead and create those bricks without actually giving them a position yet. For this, I'll create a new static method in GameBoard called NewGame() that will return a properly created GameBoard. My final GameBoard class looks like this:
public class GameBoard
{
    public int Height { get; set; } = 640;
    public int Width { get; set; } = 480;

    public List<Brick> Bricks { get; set; } = new();
    public Ball Ball { get; set; } = new();
    public Paddle Paddle { get; set; } = new();

    public static void NewGame()
    {
        var board = new GameBoard();

        // create bricks
        for (var row = 0; row < 6; row++)
        {
            // 24 columns == 480 width / 20 pixel wide bricks
            for (var col = 0; col < 24; col++)
            {
                board.Bricks.Add(new Brick());
            }
        }
    }
}
What About Laying Out the Bricks?
Right now, every brick is at position 0,0. That's not a very fun game! So, my question is, should I store position as part of the rectangle, or have a separate variable to store the position? A Rectangle in DotNet is made up of a Point (x,y coordinates) and a Size (width and height). So far I've only set the Size.
I think the path of least resistance, though perhaps not the most future flexible path, is to just use the Rectangle's Point property to set the value. I can go ahead and do it within the same nested loop that creates the bricks in the first place.
First I'll add a constructor to Brick to let me set the Point of the Rectangle struct:
public class Brick : DisplayItem
{
    public Rectangle Shape { get; set; } = new(0, 0, 20, 10);
    public Brick() {}

    public Brick(int x, int y)
    {
        Shape = new Rectangle(x, y, 20, 10);
    }
}
I probably don't need the empty constructor anymore, but I'll leave it for now.
And then I'll update my NewGame() method to set the (x,y) coordinates of the bricks, again, using hardcoded values for my screen size:
    public static void NewGame()
    {
        var board = new GameBoard();

        // create bricks
        for (var row = 0; row < 6; row++)
        {
            int y = row * 10;
            // 24 columns == 480 width / 20 pixel wide bricks
            for (var col = 0; col < 24; col++)
            {
                int x = col * 20;
                board.Bricks.Add(new Brick(x, y));
            }
        }
    }
Let's Create the Ball and Paddle
We'll go ahead and create the Ball and Paddle objects now, too within the NewGame() method and give them an initial position. Again, we'll create a constructor to set the (x,y) coordinates of the Ball and the Paddle
public class Ball : DisplayItem
{
    public Rectangle Shape { get; set; }

    public Ball(int x, int y)
    {
        Shape = new Rectangle(x, y, 5, 5);
    }
}

public class Paddle : DisplayItem
{
    public Rectangle Shape { get; set; }

    public Paddle(int x, int y)
    {
        Shape = new Rectangle(x, y, 40, 5);
    }
}
And then we'll set their initial position on the GameBoard by adding these lines to the NewGame() method:
board.Paddle = new Paddle(0,635);
board.Ball = new Ball(20, 630);
This should put the paddle all the way at the left of the screen on the very bottom (640 screen height - 5 paddle height = 635), and the ball right on top of it (635 paddle top - 5 ball height = 630)
Again, we are just hardcoding everything. I know I'll need to change that later.
Displaying the NewGame
So far, I have implemented all the logic of the game (such as it is) in its own class, separated from any display logic. Part of that was because of my frustrating experience with Maui up above. But the other part is because I know I want to re-use the game logic and display it in several different ways over this series.
But, for me, I am a visual person and I like to see things as I go. So I am going to move the game logic into a C# project called Brickout.GameLogic, and create a WPF project called Brickout.Wpf.
We'll set the main component in the app to be a Canvas and set the height and width to the size we want (with the height being a little more than 640 to account for the title bar).
Here is MainWindow.xml:
<Window x:Class="BrickOut.Wpf.MainWindow"
        xmlns="http://schemas.microsoft.com/winfx/2006/xaml/presentation"
        xmlns:x="http://schemas.microsoft.com/winfx/2006/xaml"
        xmlns:d="http://schemas.microsoft.com/expression/blend/2008"
        xmlns:mc="http://schemas.openxmlformats.org/markup-compatibility/2006"
        xmlns:local="clr-namespace:BrickOut.Wpf"
        mc:Ignorable="d"
        Loaded="MainWindow_OnLoaded"
        Title="BrickOut" Height="700" Width="480">
    <Canvas Name="GameCanvas" Height="700" Width="480">

    </Canvas>
</Window>
In the code behind, let's add the MainWindow_OnLoaded method, create a new GameBoard:
    public partial class MainWindow : Window
    {
        public GameBoard CurrentGame { get; set; } = GameBoard.NewGame();

        public MainWindow()
        {
            InitializeComponent();
        }

        private void MainWindow_OnLoaded(object sender, RoutedEventArgs e)
        {
            DrawGameBoard();
        }
    }
Before we get to the DrawGameBoard() method, let's choose the colors we want our bricks to be. The only possible option here is to choose the first 10 colors of the Colors enum, in alphabetical order:
        private List<Color> BrickColors = new()
        {
            Colors.AliceBlue,
            Colors.AntiqueWhite,
            Colors.Aqua,
            Colors.Aquamarine,
            Colors.Azure,
            Colors.Beige,
            Colors.Bisque,
            Colors.BlanchedAlmond,
            Colors.Blue,
            Colors.BlueViolet,
            Colors.Brown
        };
Yes, that should be truly ugly!
All our DisplayItems are System.Drawing.Rectangle objects, but to show them on a WPF canvas, we need to convert them to System.Windows.Shapes.Rectangle objects and set them on our canvas. We'll create a method specifically to do that:
private void AddRectangleToCanvas(SolidColorBrush brush, int x, int y, int width, int height)
    {
        var wpfRect = new Rectangle();
        wpfRect.Fill = brush;
        wpfRect.Width = width;
        wpfRect.Height = height;
        GameCanvas.Children.Add(wpfRect);
        Canvas.SetTop(wpfRect, y);
        Canvas.SetLeft(wpfRect, x);
    }
Note we are taking x, y, width, and height as parameters here instead of a System.Drawing.Rectangle (which would have been easier). But I wanted to avoid the confusion of referencing a type called Rectangle multiple times.
Now let's implement the DrawGameBoard() method and add the bricks, ball, and paddle to the board:
private void DrawGameBoard()
        {
            GameCanvas.Children.Clear();

            foreach (var brick in CurrentGame.Bricks)
            {
                AddRectangleToCanvas(
                    GetNextBrickColorBrush(),
                    brick.Shape.X,
                    brick.Shape.Y,
                    brick.Shape.Width,
                    brick.Shape.Height);
            }

            AddRectangleToCanvas(
                new SolidColorBrush(Colors.Red),
                CurrentGame.Paddle.Shape.X,
                CurrentGame.Paddle.Shape.Y,
                CurrentGame.Paddle.Shape.Width,
                CurrentGame.Paddle.Shape.Height);

             AddRectangleToCanvas(
                            new SolidColorBrush(Colors.Green),
                            CurrentGame.Ball.Shape.X,
                            CurrentGame.Ball.Shape.Y,
                            CurrentGame.Ball.Shape.Width,
                            CurrentGame.Ball.Shape.Height);
        }
The GetNextBrickColorBrush() simply keeps an iterator over our beautiful list of colors and makes it iterate forever by resetting back to 0 when it gets to the end:
        private int nextBrickColorIndex = 0;
        private SolidColorBrush GetNextBrickColorBrush()
        {
            var brush = new SolidColorBrush(BrickColors[nextBrickColorIndex]);
            nextBrickColorIndex += 1;
            if (nextBrickColorIndex >= BrickColors.Count)
            {
                nextBrickColorIndex = 0;
            }

            return brush;
        }
Now let's run it and see how beautiful our game board is:
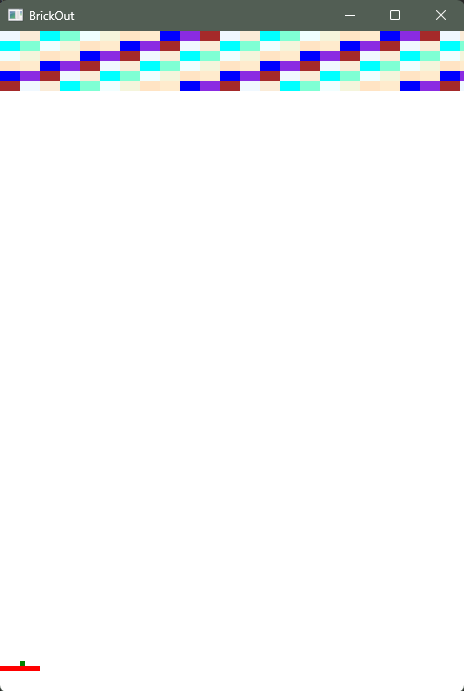
Yes, very beautiful!
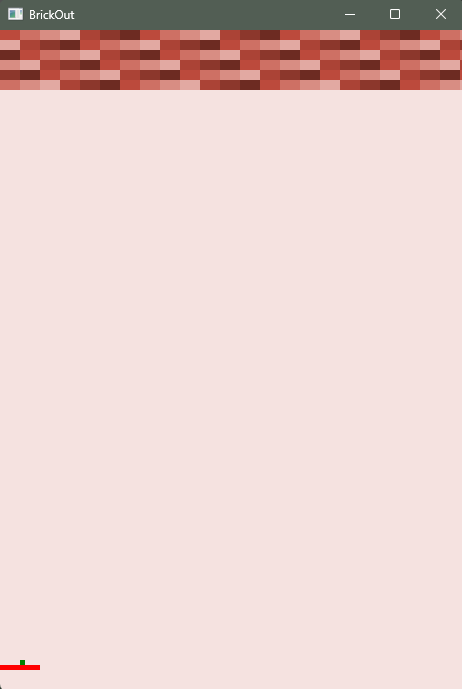
Let's play with the colors a little. Since the game is called "Brick Out" let's set a color palette that looks a little more like, you know, brick:
        private List<Color> BrickColors = new()
        {
            (Color)ColorConverter.ConvertFromString("#BC4A3C"),
            (Color)ColorConverter.ConvertFromString("#CE7064"),
            (Color)ColorConverter.ConvertFromString("#D88D83"),
            (Color)ColorConverter.ConvertFromString("#E2A9A2"),
            (Color)ColorConverter.ConvertFromString("#AB4336"),
            (Color)ColorConverter.ConvertFromString("#8C372C"),
            (Color)ColorConverter.ConvertFromString("#6D2B22"),
        };
Let's Move The Paddle
Next step would be to move the paddle back and forth across the screen. I want to be able to use the mouse to control the paddle since that will allow faster movements than just arrow keys. So let's add some mouse event listeners.
First, Some Refactoring
Above, I ask the question:
Right now, every brick is at position 0,0. That's not a very fun game! So, my question is, should I store position as part of the rectangle, or have a separate variable to store the position?
One thing to note about the Rectangle is that it is an immutable struct and that I cannot change the (x,y) position of the Rectangle without recreating it, and there is not any built-in methods to create a new one from an existing one easily. Instead, I'll add a Location to the DisplayItem interface.
Which means that the Shape property can just be a Size, since I'm really only using half of the Rectangle.
public interface DisplayItem
{
    public Size Shape { get; set; }
    public Point Location { get; set; }
}
Which means updating the constructors for all the DisplayItems to look like this (this is just the Brick one, but they all look the same, but with different Size numbers):
    public Brick(int x, int y)
    {
        Shape = new Size(20, 10);
        Location = new Point(x, y);
    }
And then updating the calls to AddRectangleToCanvas in the MainWindow.xaml.cs to use the new Location property:
	AddRectangleToCanvas(
		GetNextBrickColorBrush(),
		brick.Location.X,
		brick.Location.Y,
		brick.Shape.Width,
		brick.Shape.Height);
Since showing all the little refactorings in the blog post is too much to type (and tedious to read!) here is the post-refactoring commit and this is the updated BreakoutModel.cs that has the separated Rectangle.
Back to Mouse Movements
In MainWindow.xaml.cs, we will hook up the MouseMove event for the GameCanvas to an event handler called GameCanvasOnMouseMove and then update the Location of the paddle when the mouse moves:
        private void GameCanvasOnMouseMove(object sender, MouseEventArgs e)
        {
            var position = e.GetPosition(GameCanvas);
            CurrentGame.Paddle.Location = new System.Drawing.Point((int)position.X, 0);
        }
When I run this, I can see the breakpoint hitting and the location being updated. However, the screen is not updating, because we only call DrawGameBoard one time.
We could choose to update the position of the paddle on the screen here, but MouseMove events are VERY noisy and since we are going to also need a smoothly traveling ball, let's set up a timer that updates the display of the game several times per second.
If we want the screen to refresh at 30 frames per second, we will want our timer to fire every 33 milliseconds.
Also, in the original DrawGameBoard() method we are not actually storing the Rectangle objects that are created which represent the paddle and ball. So let's create some fields in MainWindow to hold the timer and the rectangles for the paddle and ball:
        public DispatcherTimer refreshTimer;
        public Rectangle paddleRectangle;
        public Rectangle ballRectangle;
I am going to modify the AddRectangleToCanvas() method to return the created Rectangle and store the ball and paddle objects in the new fields when they are created. Here is the updated code which creates the original ball and paddle:
paddleRectangle = AddRectangleToCanvas(
	new SolidColorBrush(Colors.Red),
	CurrentGame.Paddle.Location.X,
	CurrentGame.Paddle.Location.Y,
	CurrentGame.Paddle.Shape.Width,
	CurrentGame.Paddle.Shape.Height);

ballRectangle = AddRectangleToCanvas(
	new SolidColorBrush(Colors.Green),
	CurrentGame.Ball.Location.X,
	CurrentGame.Ball.Location.Y,
	CurrentGame.Ball.Shape.Width,
	CurrentGame.Ball.Shape.Height)
Finally, we will set up the DispatchTimer in the OnLoaded method, after the game board is created
        private void MainWindow_OnLoaded(object sender, RoutedEventArgs e)
        {
            GameCanvas.Background = new SolidColorBrush((Color)ColorConverter.ConvertFromString("#F5E2E0"));
            GameCanvas.MouseMove += GameCanvasOnMouseMove;
            DrawGameBoard();
            refreshTimer = new DispatcherTimer();
            refreshTimer.Interval = new TimeSpan(0, 0, 0, 0, 33);
            refreshTimer.Tick += RefreshTimerOnTick;
            refreshTimer.Start();
        }

        private void RefreshTimerOnTick(object? sender, EventArgs e)
        {
            UpdateGameBoard();
        }
And implement the UpdateGameBoard() method that fires whenever the timer ticks. For now this method will just update the paddle. But we will add updating the ball and other logic to it later:
private void UpdateGameBoard()
{
	if (paddleRectangle == null)
	{
		return;
	}

	Canvas.SetLeft(paddleRectangle, CurrentGame.Paddle.Location.X);
}
When we run it, we can see how it works. In the image below you can see the paddle tracking my mouse as I move it.

I'll probably come back to this later when I start fine-tuning the game because right now the paddle moves very fast and responsively with my mouse which will probably make the game too easy (unless I make the ball move very fast!)
This is a good point to check-point the code. It's easier to see the changes to MainWindow.xaml.cs in the Github diff viewer.
Moving the Ball
The next obvious step is getting the ball to move. This is the part where my lack of math classes for the last 30 years is going to bite me. And, honestly, this is the part of video game development that has always seemed intimidating.
One of the reasons I chose Breakout as the game to clone is that there IS a math component to it, but it shouldn't be TOO complicated. I shouldn't have to deal with matrixes or transformations or anything like that (which I only vaguely remember from an old Algebra 2 class.) Instead, I should be able to use vectors to track the direction and velocity of the ball and appropriately add or subtract values from those vectors (or reverse them) whenever the ball hits something.
At least, that's the idea that is in my head right now. We will see what the reality becomes.
First let's add variables to the Ball to track its velocity:
    public int VelocityX { get; set; } = 1;
    public int VelocityY { get; set; } = -1;
Since the ball position is starting in the bottom left corner (0,630), we want the Y value to decrease (so the ball moves up the screen) and the X value to increase (so the ball moves from the left to the right across the screen.)
To our UpdateGameBoard() method, which is called at every tick of the timer, we will call a new method called UpdateBallPosition() which adds the velocity to the current location of the ball and updates it on the screen.
private void UpdateBallPosition()
{
	var newX = CurrentGame.Ball.Location.X + CurrentGame.Ball.VelocityX;
	var newY = CurrentGame.Ball.Location.Y + CurrentGame.Ball.VelocityY;
	CurrentGame.Ball.SetLocation(newX, newY);
	Canvas.SetLeft(ballRectangle, CurrentGame.Ball.Location.X);
	Canvas.SetTop(ballRectangle, CurrentGame.Ball.Location.Y);
}
I also added a SetLocation() method to the Ball (and the Paddle) to get the references to System.Drawing out of the MainWindow.xaml.cs code (since WPF has its own implementations of Rectangles, Points, and other similar components.)
Here is what it looks like with the speed set to 1 (VelocityX = 1, VelocityY = -1):

After playing around a little, I'll go with 8 (8,-8) as the initial velocity. This is satisfyingly faster:

The ball, of course, is flying off the side of the screen because it doesn't know about borders and edges. That will be the next step. But first, let's go ahead and commit this step so we can track what changed.
Edge Detection
Let's stop the ball from flying off the edge of the screen. Instead, we want the ball to "bounce" off the edges (or "reflect.") Because all of our edges in this game are right-angles, we can take a shortcut to figuring out how the ball reflects. All we need to do is reverse the velocity of the direction where it reached the edge.
For example, if the ball is traveling to the right of the screen with a VelocityX of 8, when it reaches the right most part of the screen, we need to set the VelocityX to -8 so it starts traveling back in the other direction.
One of the other things I want to change in this step is where the logic is stored. This logic shouldn't be in the WPF code, whose only job should be displaying the game and reacting to user events, rather, it should be encapsulated as part of the game logic inside of the game itself. We are going to introduce a BrickOutGame class in our BrickOut.GameLogic project and move the ownership of the GameBoard into that class. This class is also where we will store the logic for the ball movement and the various hit tests.
First, before we implement any more logic, let's do the refactoring. I won't walk through all the changed bits, but you can see the updated code in this commit at github.
Now we'll move the UpdateBallPosition() method into the BrickOutGame class and implement the edge detection:
    public void UpdateBallPosition()
    {
        var newX = GameBoard.Ball.Location.X + GameBoard.Ball.VelocityX;
        var newY = GameBoard.Ball.Location.Y + GameBoard.Ball.VelocityY;

        if (newX >= GameBoard.Width -5 || newX <=0)
        {
            GameBoard.Ball.VelocityX *= -1;
        }

        if (newY >= GameBoard.Height -5 || newY <= 0)
        {
            GameBoard.Ball.VelocityY *= -1;
        }

        GameBoard.Ball.SetLocation(newX, newY);
    }
I'm still hardcoding all my values for paddle size and ball width. I'll need to come back and change that in a fine-tuning step (for instance, I think the ball is too small right now.)
Here is the ball moving around the screen and bouncing off the edges:
It is still not aware of the other items on the screen, like the paddle and the bricks. But that will be the next step.
Let's go ahead and commit this step before we move on.